Well, kadang gue suka lupa standar stair, maka disini gue bakalan share sekaligus buat remind me dikala lupa. Berikut adalah Standar Stair yang gue sadur dari AISC (American Istitute of Stell Construction).
Sorry juga nih bahasanya di mix Prinsip Dasar Detailing Stair:
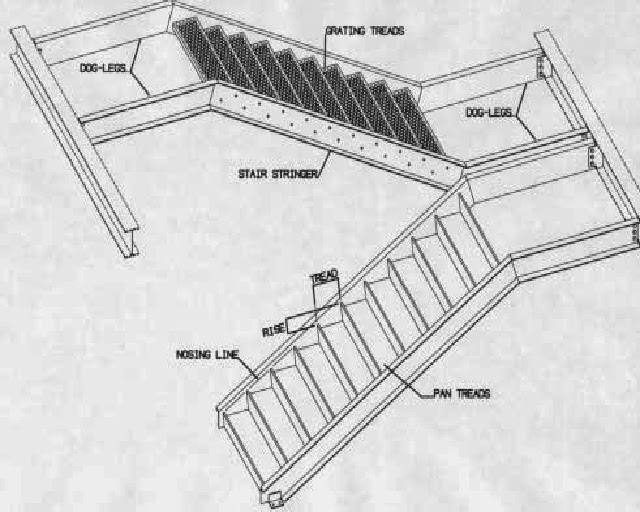
STRUCTURAL STEEL COMPONENTS.
Tread: The tread is the piece of steel
that makes up the steps of the stair.The tread can be made from grating or
from pans (both shown in Figure 1).
Grating is typically used in industrial
buildings while pans are usually used in
commercial structures. The grating type
of tread is plate, but the pan shape dips
down so that the concrete can be poured
into its base.
Sanitary-type pans, which are common
in hospitals, have an additional lip
that prevents dirt from falling into the
corner of the pan.
(Pan and grating treads are shown in
Figure 2.)
Stringers: The stringers support the
ends of the treads. Stringers are often
rectangular hollow sections, channels or
plate. The top of the stringer is connected
either to a supporting beam or to a dog leg (see Figure 3).
The bottom of the stringer is connected
to a supporting beam, a dog leg, or
the ground. If attached to a supporting
beam, the stringer can be bolted or
welded. If attached to a dog leg, the
stringer will be welded.
Supporting Beam: The supporting
beam supports the stringer or the dog
leg (if it exists). Each stringer can be
independently supported. Alternately,
both stringers can be supported with
the same supporting beam. The supporting
beams are usually wide flange
sections or channels.
Dog legs: The location of the supporting
beams determines whether dog legs
are actually needed (as shown in Figure
4). A dog leg is needed when a viable
connection cannot be made to the supporting
beam directly from the stringer.
The dog leg can be the support for the
landing at the top of the stair, if one
exists.
Special pans: These are required at
the top and bottom of a pan stair. One
special pan closes the stair against the
concrete or platform, and the other pan
closes off the top of the stair (see Figure
5).
LOCATION
The main parameters for
locating the stairs are:
• Rise and tread
• Nosing points and nosing line
• Stringer offset values
• Dog leg to nosing point height
• Safe rise and safe run
• Number of treads
An explanation of these terms
follows:
Rise and tread: Although the
actual stair step is called the
tread, there is also a measurement,
as shown in Figure 1,
which is termed the 'tread'. This
is the horizontal distance
between two consecutive treads.
The rise is the vertical distance
between two consecutive treads.
Nosing line and nosing
points: In order for the stair to
be set up properly, every corner
of every tread should pass
through a single line. That line
is called the nosing line, and the
corner points on the tread
through which the line traverses
are called the nosing points.
Stringer offset value (top of
steel of stringer to nosing
line): As shown in Figure 6, the
stringer offset is the perpendicular
distance between the top of
steel of the stringer and the nosing
line. The stringer offset
value is required for locating the
stringer in space.
Dog leg to nosing point
height: Where dog legs are
required (i.e. cases where the
stringer can't directly make a
viable connection to the supporting
beam), it is necessary to
locate the dog legs. The top dog
leg to nosing point height is the
distance from the top nosing
point to the top of steel of the top
dog leg. The bottom dog leg to
nosing point height is the distance
from the bottom nosing
point to the top of steel of the
bottom dog leg.
Safe rise and safe run: The following
general guidelines are
typically used for indoor stairs in
insuring that the stair is safe:
• 3/16 maximum variation in rise
or tread is allowable.
• 2 x rise + tread should be
between 24” and 25”.
• Rise + tread should be
between 17” and 171/2”.
• Angle of the stair should be
between 20 and 50 degrees.
Note: tread minimum and rise
maximum, as well as other
important parameters are governed
by local or state codes.
Number of treads: The number
of treads is obtained by dividing
the total rise by the safe rise, or
alternately by dividing the total
run by the safe run.
CONNECTIONS
Grating to stringer: A typical
grating to stringer connection is
shown in Figure 7. The grating
manufacturer specifies the location
of the bolt holes.
Pan to stringer: A typical pan
to stringer connection is shown in
Figure 7. Other connection types
include double angles with a
square rod bent around the pan
and welded to both the pan and
the stringer.
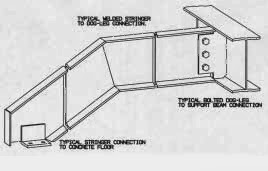
Stringer to dog leg: A common
stringer to dog leg connection is
shown in Figure 3. This is a
welded connection with both
ends mitered.
Stringer to ground: A common
stringer to concrete floor connection
is shown in Figure 3.
Sekian dulu yaaa, buat standar koneksinya i'll be back soon :D so you better keep watching